
How to Quilt by Hand
Hand quilting does not require a sewing machine. Historically the goal in hand quilting is to make the stitches small . But more recently, with the modern quilting movement, big stitches have become popular. Hand quilters usually use a stencil for creating their designs and these are great for beginners. See my blog post on “How to Mark your Quilt for Quilting” for ways to mark your quilt with stencils. Appliqué blocks are typically quilted using echo quilting to make the shapes have more dimension.
For hand quilting, you will need the following supplies:
- Short needles called quilting needles or Between”s. These needles are short with a small eye. Common sizes are 8, 9, or 10. Size 8 is usually best for beginners.
- A thimble to push the needle through the layers of the quilt. It’s important to pick one that is comfortable and fits well.
- 100% cotton quilting thread. For strength and durability, choose a thread that is made specifically for hand quilting.
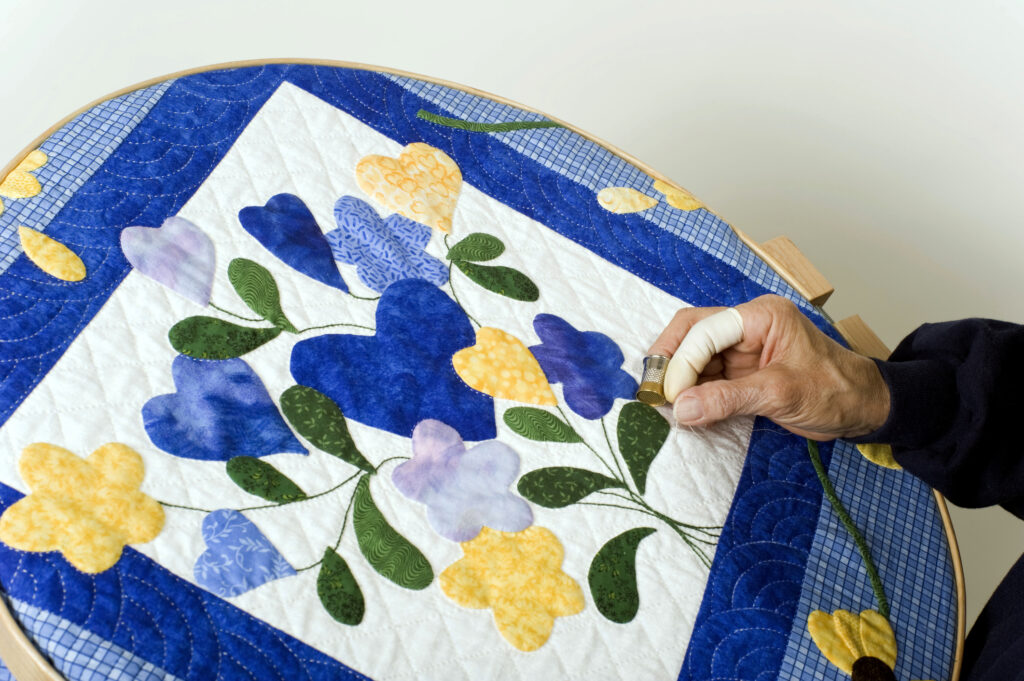
- A frame or hoop to keep the quilt taut as you sew. A frame or hoop also helps support the weight of the quilt as you stitch and keeps both hands free for stitching. Quilting hoops are more portable than a frame and are less expensive.
- A comfortable, well-lit place to sit while you quilt.
Steps for Hand Quilting
There are many different methods of hand quilting, but the stitch itself is a basic running stitch. The running stitch consists of a series of straight stitches, with the stitch length equal to the space between the stitches.
After practicing for a while, each quilter will develop a personal style or technique for making the running stitch. Here are the instructions for the most common method of quilting by hand:
- Starting at the center of the quilt top, insert the quilt into the hoop, pulling the quilt so that there is slight tension on the layers. Don’t pull the fabric
- Thread the needle with a length of quilting thread about·16″ to 18″ long. Knot one end of the thread.
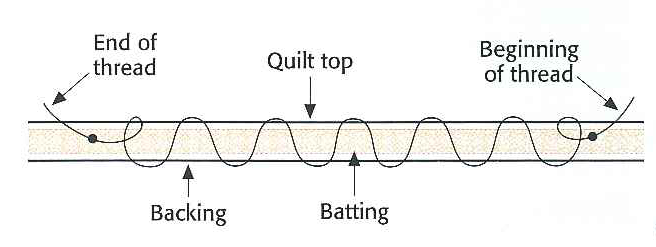
- Insert the needle through the quilt top and the batting (not the backing!) about 2 inches from where you want to start quilting. Pull on the needle until the knot catches against the top fabric. Gently tug on the thread to pop the knot through the quilt top and bury it in the batting.
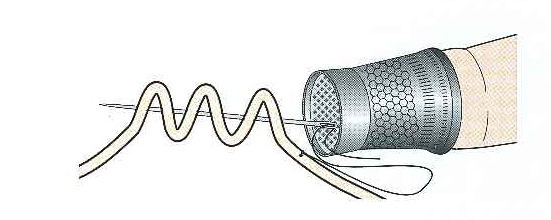
- Hold the needle between the thumb and forefinger of your sevving hand. Place your other hand under the quilt at the spot where you plan to start. With the needle angled slightly away from you, push the needle down through the quilt. As soon as you feel the tip of the needle underneath the quilt, use one finger of the bottom hand to direct the needle back up through the layers to the top.
- Using your thimble to push on the eye end of the needle, continue rocking the needle up and down through the layers. Take three to six stitches before bringing the needle and thread completely through the layers. Continue to quilt in this manner until you near the end of the thread.
- To end a line of stitching, bring your needle to the guilt top, close to your last stitch. Make a small knot. Take a tiny backstitch into the quilt top, through the top and the batting only, and then bring it back to the surface. Tug gently on the thread to pop the knot into the batting layer. Clip the thread close to the surface of the fabric. Repeat this process, moving the hoop as needed, until the quilting is completed.
I would enjoy seeing your hand quilting projects and hearing your tips. Send me an email or comment below.